

Pie crust stitching. Skin stitching. Raised lake. Reverse skin stitching. Split and lift. Round closing. And so on. The terms surrounding apron stitching and split toes are many, and they are often confused and used wrong. Here everything is hopefully straightened out and clarified in a good way.
First of all, the types of seams described here can be used in various places, but are most commonly found on the seam on apron front shoes – like loafers or apron derbies – and / or at the split toe seam on shoes with two leather pieces attached at the toe tip or where one have a seam simulating this – like split toe derbys, split toe loafers etc. Shoes can have an apron but don’t have a split toe, but basically all shoes with split toes have an apron. The apron refers to the leather piece that is the tongue and go forward to the toe, and the seam that attaches the apron to the rest of the shoe is traditionally called a lake. Note that all explanations used in the article are based on leather with the grain side out.
Below all the types of seams that we’ll go through in this article, and the most commonly used names for them (to my knowledge, there’s likely many other names used as well that can be more common in certain areas etc.). I’ve divided them into seams made in one piece of leather, and seams that connect two separate pieces. The illustrations show the parts in intersection, the brown is the leather outlines, the grey is the thread.

Seams in one piece of leather
Raised lake in one piece of leather

Things can never be easy. As if all these terms weren’t hard to distinguish as is, there’s also one that most commonly goes by the same name despite being two very different ones. This type of raised lake is done in a single piece of leather, where the seam raise the leather giving it a decorative look with the threads going on each side of the raised part. Can be done in various ways, but most common when it comes to welted shoes and often best looking is if it’s done by hand. Also a simulated split toe can be made with this type of seam. One thing that is a bit special is that this can be done as normal on a loose upper, but it can also be made with the upper on the last.

Here it’s quite easy to see that this apron seam is basically made in a wholecut loafer. Picture: Skolyx

Another example where both the toe apron and the toe seam is stitched in a full piece of leather. Picture: Gabucci

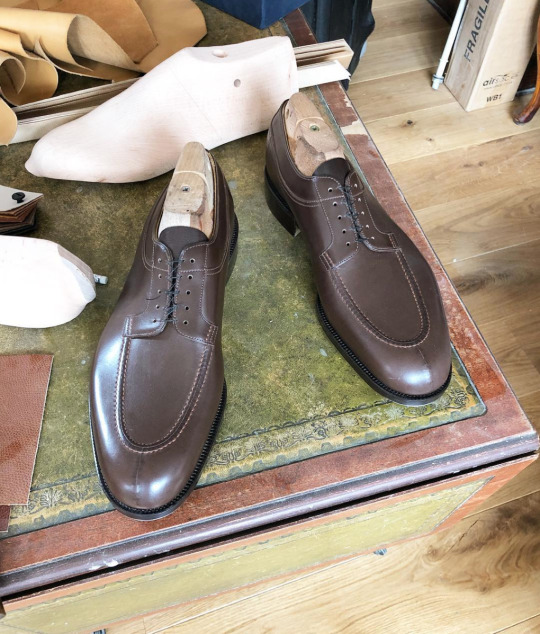
Here’s the most common way to stitch the apron seam, loose upper, pre-punched holes, stitching by hand. Picture: TLB Mallorca
Split raised lake

This is basically like the version above, just that one cut a groove in the raised lake to enhance the look. This way it visually looks more like it’s made of separate pieces of leather, and you have a clearer marking in between the sections of the shoe. Can be done both on the lake and on the toe tip.

Split raised lake and split toe on a Bridlen split toe derby.
Raised lake with centre cord

This looks very similar to a regular raised lake in a single piece of leather, and is sometimes difficult to keep apart, but what one achieves by having a thread in the center of the lake is to be able to raise it, hence enhance it, even further. Also here it comes out best if the stitching is done by hand.

With a cord in the centre of the apron stitching one get a more pronounced lake. Picture: Drake’s
Split raised lake with centre cord

Also here one get a higher lake by embedding a thread, but then also split it to get a groove in the middle. Enhancing the aesthetics for the enhanced version, so to speak. Cause all these versions made in a single piece of leather don’t really have any function apart from aesthetics.

Here one have raised the lake further and cut a small groove.
Reverse skin stitch

This is the best way to simulate a round closing skin stitch, the highest rated toe seam. It’s done basically the exakt same way, but since you do it in a full leather piece it’s easier, hence a clever shortcut. This can be done fully by hand, or where one use a special machine to punch the hole halfway through the leather and then do the stitching by hand, a con with the latter is that the thickness and firmness of the leather needs to be just right for the machine to work.

This toe seam may look like a regular skin stitch in two separate pieces, but is done in one single piece of leather. If done right, one have to look very carefully to see the difference.
Seams attaching two pieces of leather
Plain lapped seam

This is the basic type of seam used when attaching pieces of leather for a shoe upper. You skive the edges, grain side on one piece and flesh side on the other, place one part of the leather on top of the other, and stitch them together with a sewing machine with one or more rows of stitching. This can also be used when attaching the apron of a loafer or split toe derby. On Belgian loafers, this type of seam is used just together with a beaded leather piece which makes it look a bit different. You rarely do split toe seams with this type, for obvious asymmetrical reasons.

Here the apron is attached with two basic stitched on lapped leather pieces. Picture: Allen Edmonds
Raised lake (plain seam if the other way around)

One common way to attach the apron on both loafers and split toe derbys is by doing a stitching flesh side to flesh side close to the edge of the pieces, and by this create a raised lake with the edges of the leather. Also the split toe seam is done this way sometimes. If one do it the other way around, place the grain side to grain side and have the edges placed inwards, you get a normal plain seam that is commonly used as a split toe seam (also seen a lot for back seams on the heel). This is the common way one assemble fabrics for clothing, just done on leather.

This version have the parts placed flesh side against flesh side and then stitched close to the edge. Stitches can be made either with machine or handmade. Picture: Pictuturo

Here the leather at the apron is folded outwards to form a raised lake, while the toe part is folded inwards for a plain seam, both machine stitched. Picture: Sons of Henrey

One can achieve a different look by doing braiding along the apron stitching, then all has to be done by hand. Picture: Acme Shoemaker
Plain seam with decorative side seams

This is exactly the same version as the inwards-folded one above, but to mark the split toe more one do a row of stitching on each side of the plain seam as well. Solely decorative, no function.

Toe with stitching along each side for a more distinct visual. Picture: Myrqvist
Round closing / Butt stitch / Skin stitch

Here one attach two pieces that are “butted” up with the edges against each other, and a seam which only goes halfway through the leather. A very strong stitch, which was the original reason for why it was used. Called a number of names, where round closing, butt stitch or skin stitch are the most common ones, others are for example flat seam tunnel stitch. For the split toe seam one normally do it from the flesh side so one don’t see the stitches at all, while for the lake one would do it the other way around with the seam upwards so the thread is visible. Can only be made fully by hand.
Always great when one find an example that can show a type of seam from both ways. Here the apron stitch is made from the outside with visible thread, and the split toe done the other way around.

Here you can see how one do the type of upper shown above, with holes pre-punched and lake seam in progress. Pictures: Die, Workwear

Close-up of a split toe done with round closing.

Here the split toe seam is being made.
Pie crust / Split and lift

This is often confused with the skin stitch above, probably since they are often done on the same shoe, with the apron being a pie crust and the toe with round closing. A pie crust seam, or split and lift, is only done for the lake though, never the toe, since it’s an asymmetrical seam. Here the the awl go halfway through and out in the middle of the edge of the apron leather piece, and then attach to the flesh side of the side piece. The name comes from the look, it resembles the edges of a nice pie crust, although split and lift explains the technique in a better way. Can only be made fully by hand.

A nice pie crust apron stitch.

A pie crust, or split and lift, seam being done. Picture: Ettinger
Raised lake with cover piece

If most of the seam types done in a single piece of leather in the beginning were made for aesthetic purposes, this one was developed for strictly utilitarian, practical purposes. The point was to make the lake water proof. When one do a raised lake with two pieces of leather attached, water can get in through the middle, this is solved by covering the lake with a separate leather piece. The fact that it looks pretty cool comes as a plus.

Loafer with a very heavy lake, which is very water resistant. Picture: Tassels HK
Tubular moccasin stitch

Moccasins is a shoe type one certainly relate to having a big apron seam, the type of loafer which has the upper go all around under the foot. Some of the above ones are used for moccasins as well, but thought I’d include one type which is most characteristic for moccasins, but also used for other types of loafers where one want a heavy lake. This is done by a special type of sewing machine, which attach two pieces together and has seams going over the high raised lake part. The thread going over can go straight or in cross sections, both are called tubular moccasin stitch.

Loafer with a tubular moccasin lake stitch. Picture: Loake
As always, may be certain parts I’ve gotten wrong here, please let me know if this is the case and I’ll correct it.


Very comprehensive, thanks for this!
Lee Chang: Glad you liked it!
Good article. I am just learning footwear production. The terms are very helpful. Thank you.
Angel Jones: Thank you, nice that it was useful!
Great article. One question: How the name “norwegian split toe” (NST) came from? Have seen the origin of norwegian welt but never found clues of NST. Thanks in advance.
DX: Thanks! You actually have the history behind this here: https://shoegazing.com/2017/10/29/history-the-split-toe-derby/
Great and very usefull guide. Though unusual, there are plain lapped split toe seams. I had a pair of Ferragamo loafers like that. The result is asymmetrical but not too bad if done well. The closing of the uppers was excelent and I am not sure if the maker did that just because it was a simple solution, maybe it was the clean look…
John: Thank you! Alright, have never seen that, but good to know.
Thanks for the very detailed article. One question, what’s the type of apron seam seen in the picture used to show the ‘Reverse skin stitch’ of the split toe? Pic: https://i0.wp.com/shoegazing.com/wp-content/uploads/2023/03/DSC04143-scaled.jpg?ssl=1
Another similar with the seam in both apron and split toe: https://www.casafagliano.com/wp-content/uploads/2018/08/Ligure-Dark-Oak-Antique-Calf_4.jpg
Leandro: I believe it’s a reverse skin stitch, but made the other way around so to speak.
Great article, Jesper. Is there yet another seam that’s similar to your “raised lake with cover piece”, but with the edge of the apron used as the cover piece?