

Hiro Yanagimachi is one of the pioneers of the new wave of Japanese bespoke shoemakers which established themselves in the last 15 years. He offers MTO, MTM/semi bespoke and full bespoke, and with a newly developed international last and planned visits to Europe and the US, he is one of the Japanese makers who is of the most interest for us over here. I give you a large buyer’s guide to the brand, with a pair of MTO split toe derbies that I ordered as a framework.
Read the article in Swedish here on the Swedish version of Shoegazing.
Hiro Yanagimachi started his brand in 1999 after being trained as a shoe designer and shoemaker in England at the London College of Fashion and at John Lobb Ltd. Back then at the end of the last century there were only a few Japanese bespoke shoemakers who lived and worked quite anonymously, today there are as mentioned before on this blog over 50 bespoke makers in the country and the RTW market is considered to be the most important one in the world.

Hiro Yanagimachi.

The small showroom.

The workshop which is very neat and tidy.
The workshop is located in the Sendagaya area of Tokyo, on the second floor of a small apartment house. Upon entering through the door is a showroom section with a lounge directly to the right, and further in is the workshop and a small office corner. Hiro Yanagimachi do the lasts and some bottoming work, and in the workforce he has the maker Kiichiro Ozeki, pattern maker and closer Konomi Egawa, pattern maker and closer Nobuko Kuwahara and the apprentice maker Shunsuke Moriyama. It’s a relaxed atmosphere in the workshop, they are chatting and joking with each other, but when more concentration is required they “close down,” and sit quietly bowed and focused. What’s created here in the workshop is shoe of the absolute highest standard, and below follows a review of what Hiro Yanagimachi offers, how the shoes are made and a summary with result of my order.

Ongoing making.

Konomi Egawa.

Nobuko Kuwahara.

Kiichiro Ozeki.

Shunsuke Moriyama.

When I visited Konomi Egawa was doing new patterns for all their models for the new international last. It was a lot of erasing and re-drawing., small corrections here and there, to find the right balance in the pattern. A very time consuming process.
Offerings
The brand offers three different types of orders (prices excl. 8% VAT):
– Made To Order (MTO), prices in Japan start at about €1 060 (140 000 yen). It uses existing lasts, and for us Europeans or Americans it is his new international last that is of interest, since it’s made to fit our type of feet. At the moment it’s only available in a version with a round toe, quite neat and elegant, and a version with a chiseled toe is being developed. As base model you can select one of the oxfords, derbies or lazymans they offer, and you can then choose leather, construction details, etc. (more on that below).
– Made to Measure (MTM)/semi bespoke, starting in Japan at €1 900 (250 000 yen) for the first order. This is made with some modifications to the last after the customer’s feet. Besides loafers, you can choose any model whatsoever, including for example boots and monk shoes and you can make modifications to existing designs. No fitting, excluding boots.
– Bespoke, cost in Japan is from €2 650 (350 000 yen) for the first pair. Full bespoke, a completely individual last is made up and you can select any model type whatsoever. At least one fitting is required, often more than that.

Fiddle back waist.

Shoes in three different stages of production, so to speak.
Prices for the MTO above are starting rates with the simplest construction method in which the shoes are made with machine made sole stitch and a so-called square waist. For completely handmade construction, bevelled waist and so on, it’s different surcharges (MTM and bespoke are always made entirely by hand). It’s also a bit more expensive to order when they’ve traveled to Europe or the United States. More about this under the headlinne Prices below.
Lasts
For Japanese and other Asian customers with flatter and wider feet and a more cupped heel, there are two main lasts to choose between, a classic round and slightly square, in the case of MTO and MTM.

The standard round last.

The chiseled last for Asian feet.
Hiro Yanagimachi has as mentioned now developed an international last that is much better suited for Europeans and Americans foot shape. This is a so far only a classic round last, but one version with a chiseled toe is also underway.

Test shoes on the international last.
Models
Hiro Yanagimachi has a very wide range of models for its MTO and MTM, it’s something to be found for pretty much everyone’s taste. On his website you can look through the entire range. Below some examples of lace-ups and lazymans which can be ordered as MTO.

Oxford, derby and a so called ghillie.

Classic models.
Prices
The following prices are valid for orders made in Japan, excluding their VAT 8%:
– Made To Order (MTO), from about €1 060 (140 000 yen) for hand welted shoe with machine made sole stitch. If you want hand sewn sole stitch there will be about €230 (30,000 yen), a bevelled or fiddle back waist adds the same amount. You can’t make bevelled waists with machine made sole stitch. To keep the starting price of the MTO variant low they also use toe stiffeners in celastic (plastic impregnated fabric) as standard (heel counter is still in the thick leather used for bespoke), if you want to have a leather toe stiffener it costs about €110 extra.
– Made to Measure (MTM)/semi bespoke, from €1 900 (250 000 yen) for the first order. Then from about €1 500 for consecutive orders.
– Bespoke, cost in Japan from €2 650 (350 000 yen) for the first pair. Then from about €1 500 for consecutive orders.

Shoe with machine made sole stitch and square waist.

Shoe with that construction from below.
Lasted shoe trees cost €230 (30,000 yen). Worth thinking about is that if you order so that the shoes will be sent from Japan to an international country, you can deduct the 8% Japanese VAT, but there will be customs and sales tax added at home. There is also usually a small price premium for shoes that are ordered during the trips, to pay for travelling costs.
When next years trunk shows in Europe and the US are settled, I will write about them here on the blog.
At certain times in Japan, and probably also for a number of visits in Europe and the states, Hiro Yanagimachi does so-called Pattern orders fairs. This means that you can order some selected models, often five, and with a more limited range of leather to choose from, as the MTO with machine made sole stitch. These are offered at a reduced price, usually about €220 down from the regular pricing, this since they can streamline the manufacturing of these.
Order process
Currently Hiro Yanagimachi only take orders at personal meetings, either in their workshop or at trunk shows. This is since Hiro is careful about good fit and wants also customers who order MTO to try out their size to ensure that it becomes correct. He has sample shoes in all sizes of their lasts, and the international also in larger sizes (Japanese footwear ends usually prior size UK9 at least). In many cases both oxford and derby fitting shoes are available, since they may feel different and it may be worth trying each model.
I tested out the size of during a so-called fitting survey at Skomaker Dagestad in Oslo in June. The intention wasn’tt really to take orders, the purpose was to test the international last on European customers and get input for the final development of it. However, I could place a MTO order, and after trying UK10 and 10.5 in both oxford and derby shoe samples, we concluded that I would go with UK10, this time it was also derbys I ordered which have a tendency to get a little more spacious. The international last is made with the Skomaker Dagestad-employee Stefan Ravnanger’s (which also has a Japanese wife) feet as a base. Since we in principle are feet twins and have very similar feet, the fit was very good. The hard part was if I would go with UK10 or 10.5, but as mentioned I went with the smaller one in the end.

Me trying out the new international last when Hiro visited Skomaker Dagestad in June.

Here I try a derby.
I then chose the model L33 which is a split toe derby with five rows of lacing, in the same medium brown shade as they have a sample shoe made in. Unlike the sample model I choose to make it completely handmade, with a bevelled waist and a tapered heel. I also choose toe stiffeners in leather and lasted shoe trees. The fact that it is a model with multiple hand-sewn moments also for the upper the price is much higher than the base price. With the specifications above it now ended at approximately €2 150.
Manufacturing
All shoes, whether it’s MTO, MTM or bespoke, are made in Hiro Yanagimachi’s workshop, and they use the same materials (except then if you do not choose leather toe stiffener for MTO) for all shoe styles. However, a model with my spec above is made to virtually the same standard as Hiro Yanagimachi’s bespoke shoes, except that it’s a generic last and that the heel stiffener doesn’t go as far under the arch of the foot as is usually the case for bespoke. Here’s the whole process in the workshop:

The pattern is transfered to the hide.
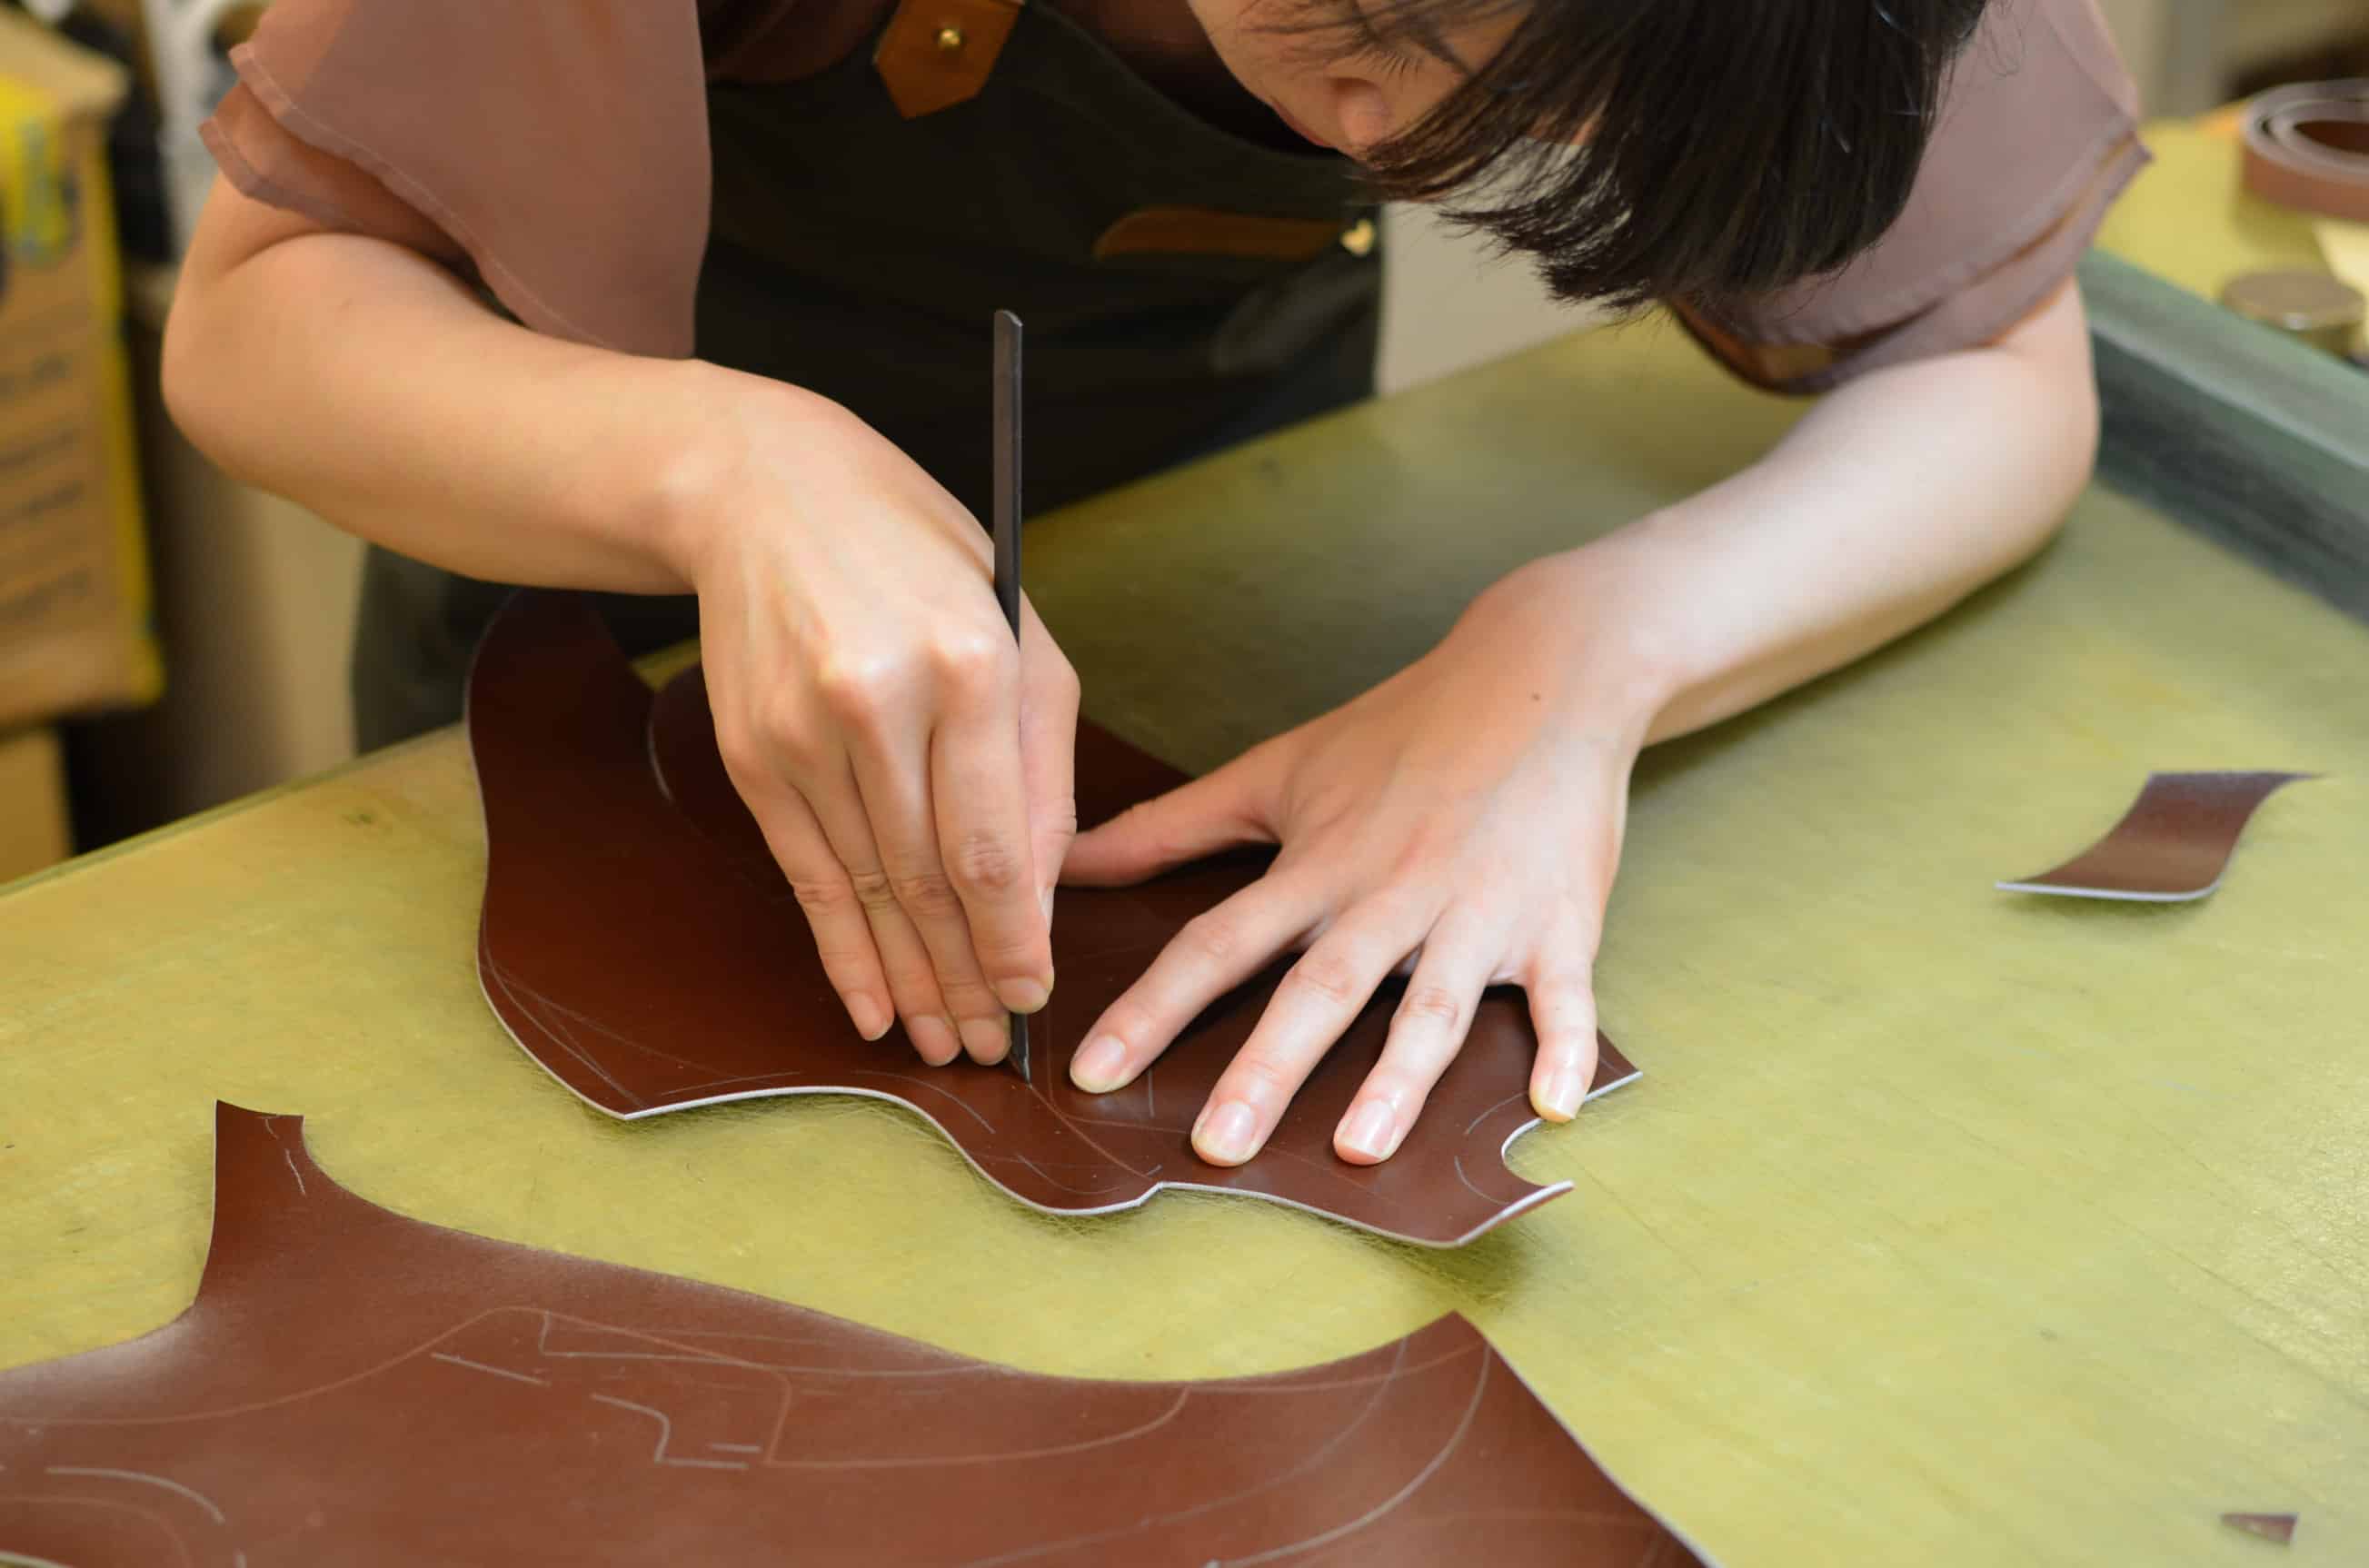
After that they cut out the pieces. It’s a bit unusual that the don’t use the template to cut after, this requires even more skill from the clicker.¨

Skiving the edges to get a smooth transition between the pieces.

The pussel soon to become the upper. The light brown pieces on top are for the lining.

With a thin awl the holes for the apron seam is made.

Ready for hand stitching.

But first the machine stitched parts of the upper is taken care of.

A special kind of knife which cuts of excess lining leather.

Now time to stitch the apron and the toe.

The insoles are cut out of a thick piece of vegetable tanned leather from the shoulder of an animal.

Shaved with a piece of glass.

Attached to the last and the edges are trimmed.

Reinforce the attachments on the sides.

Cut out the lip in which the welt seam will be stitched to. The knife used here is a bit special, you use it by pushing it from you, and it’s quite common in Japan for many different elements of the making.

Skiving the heel stiffener.

Upper is lasted.

Excess leather cut off.

Toe stiffener skived.

Attached. Note also how the sides are reinforced with leather pieces between the upper and lining.

Welt seam stitched.

Done.

Here they have attached cork plates in the front part and shank and leather build up in the back. And as you can see the inside is also clinically made.

Time for the outsole, and here they start preparing for the bevel and blind welt at the waist right away.

The channel for the sole stitch is cut open. Note also how the outsole has an edge at the waist, which will then be placed over the welt and sole stitch to hide it completely, creating a seamless transition from the bevelling of the waist to the upper leather. Back in the days a bevelled waist was synonymous with also making a blind welt waist.

Sole stitch is made. You can see how they have rolled a fudge wheel on top of the welt with the desired distance between the dimples, in which each stitch will be placed.

After the stitching is done you go over the welt again to push down the seams and to make a clean and beautiful appearance. This is the actual use for the fudge wheel, nowadays in factories it’s mainly done only as decoration only run over the stitches afterwards without the function of pressing them in place.

Sole edge is trimmed.

And rasped down roughly.

Here the blind welt has been finished and an edge iron is used to even out and shape the edge.

Time for the finer treatment, first with some glass to smooth things out, after that sand paper.

A tool to make a good looking edge on top of the outer part of the welt.

Another edge iron.

Here most of the heel have been built, and the edges are worked on.

Cleaning the outsole, which is very important especially with a natural finish like the one being made for my shoes here. All stains and marks will be seen, making it harder than to paint or decorate the sole.

The sole and heel edge has been colored and polished, and now a hot iron burn in the color in the leather.

Some cream and polish to finish things off. All pictures from the making: Hiro Yanagimachi
Final result
Since I visited Tokyo in November it worked well for me to pick up the shoes then, during a visit to the workshop. The shoes are, as also seen in the pictures, almost clinically constructed. It is an impressive precision of the work, the level of detail finish is undoubtedly the highest of all the shoes I own. Very nicely done sole edge and welt, superb waist with a real blind welt, and a beautifully tapered heel. The upper leather from Annonay is definitley of the highest class, and the soles are of oak bark tanned leather from Joh. Rendenbach. Sure there are some things that are not perfect, the closing of the aprone have some small mistakes, and the heels are not built with pieces that are completely horizontal to the ground which is commonly regarded as the most sought after. Now, I am extremely picky here, which I hope you understand.
The fit was tighter than I expected after testing the shoe samples at the fitting survey. Hiro and I talked about that the finished shoes will be lasted harder and therefore tighter than the test shoes, but the difference was larger than I expected. After I’ve had them stretched at a cobbler and worn them a few times they however begin to feel really good now. And with as mentioned a last that is made for feet that are very similar to mine they follow my feet very well in every way, just that they initially was a bit too tight.
The last is in my eyes really nice, classic and elegant, and I think that the international version is better than the original last that can be experienced bit stubby. It does also work perfectly on a model like this, and I’m very pleased with the sleek elegant impression even though it’s derby shoes. It was just what I was after.

Click on the pictures for larger versions.

–

–

–

–

–

–

–

–

–

–

–

–

–

–

–

–

–

–

–

–

–


Really looking forward to his trunk shows.
Diego: Yeah it’s great that he has started travelling abroad, making the shoes accessible to more people.
am blown away, great stuff it is and am willing to partner with him in uganda, East africa. those shoes will sell here to
The worst shoes Ive ever bought.
I buy this shoes. Not good.
Where can I be fitted and find these shoes in Boston, Massachusetts?